Ah, Infusionsoft.
One of the most popular subscription CRMs out there for small businesses.
Full of features and options to build close relationships, manage products, and keep track of your payments.
Or does it?
That payment part can be a little tricky.
Their Help Center tells you one way to do it, but it isn't the most intuitive process in the world.
Especially if you want to see what payments are NOT happening with your business.
That’s right, we’re talking about failed payments.
Credit card failures, expired cards, etc.
Unfortunately, Infusionsoft doesn’t have the most intuitive payment reporting system when it comes to managing payment failures for a subscription service. Which leads to all kinds of confusion with small businesses using subscriptions who want to figure out if they have a failed payment problem.
Well, if that’s you, you’re in luck. We’re going to go in deep here to show you how to pull a failed payment report in Infusionsoft to help you see if you have this problem or not.
And we’ll also help you avoid the ways most people try to do this and get a bad number.
1. Find the Reports Section
This is a more common problem than it needs to be.
When you login to Infusionsoft, where’s the first place you go?

For most people, it’s the Dashboard.
If you can find it. Your eyes are likely immediately drawn to the square sections on the main screen.
None of which leads you to the Dashboard, and neither of which lead you to your delinquent payments area.
If you don’t have your delinquent payment reporting setup, you won’t see anything related to it.
As such, you need to set up reporting.
Unfortunately, Infusionsoft doesn’t make it clear exactly where to go to do that.
But it does exist.
Hit the hamburger menu, then go to E-Commerce.
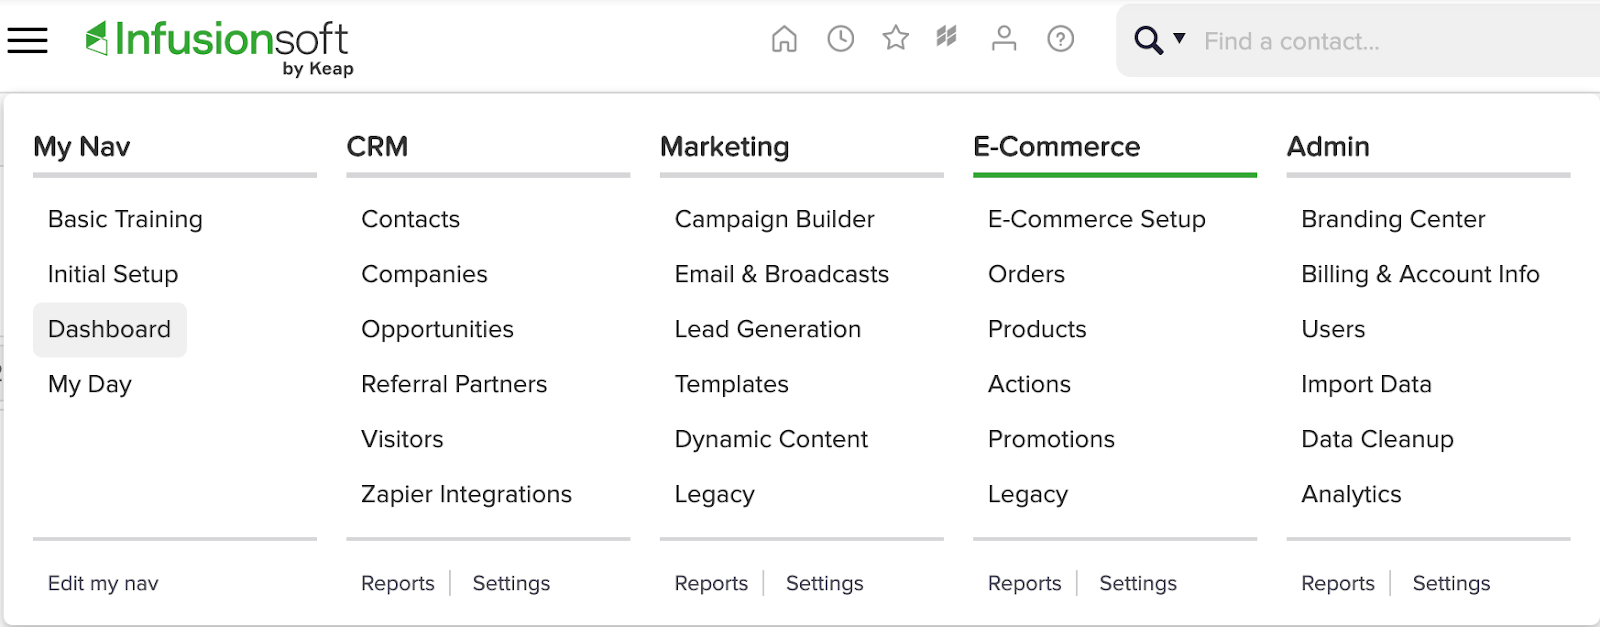
And allllll the way at the bottom there, in the small fine print, you’ll see the Reports area, right next to Settings.
There’s the first place to go to get started getting a failed payment report setup.
From there, you’ll see this menu.
This is where it gets really confusing:

For most people, it’s natural to go to either the Monthly Payments or the Payments Report section.
But neither of those places and where you’re going to find payments that are missed, ironically.
That’s actually going to be in the Receivables section, which shows all payments due and gives you the ability to filter down to past due payments and set that reporting up.
So ignore all the menu options with ‘Payments” next to it. Receivables is where it’s at to find credit card failures.
2. Set Up Past Due Receivables
Now that you’re in the right area, the next step is to set reporting up correctly so you get an accurate read of what’s failing.
Again, this can get confusing if you’re unsure what to do.
The first thing to keep in mind is to pick the products you have that are recurring in model.
If you sell one-time payment options and recurring revenue options, filtering out those one-time payment options will help you see money that you actually lost instead of single transactions that simply failed.
To do this, you have to go to the Misc. Criteria option on the Receivables menu, then scroll down to Product Ids, and choose the products that you want.
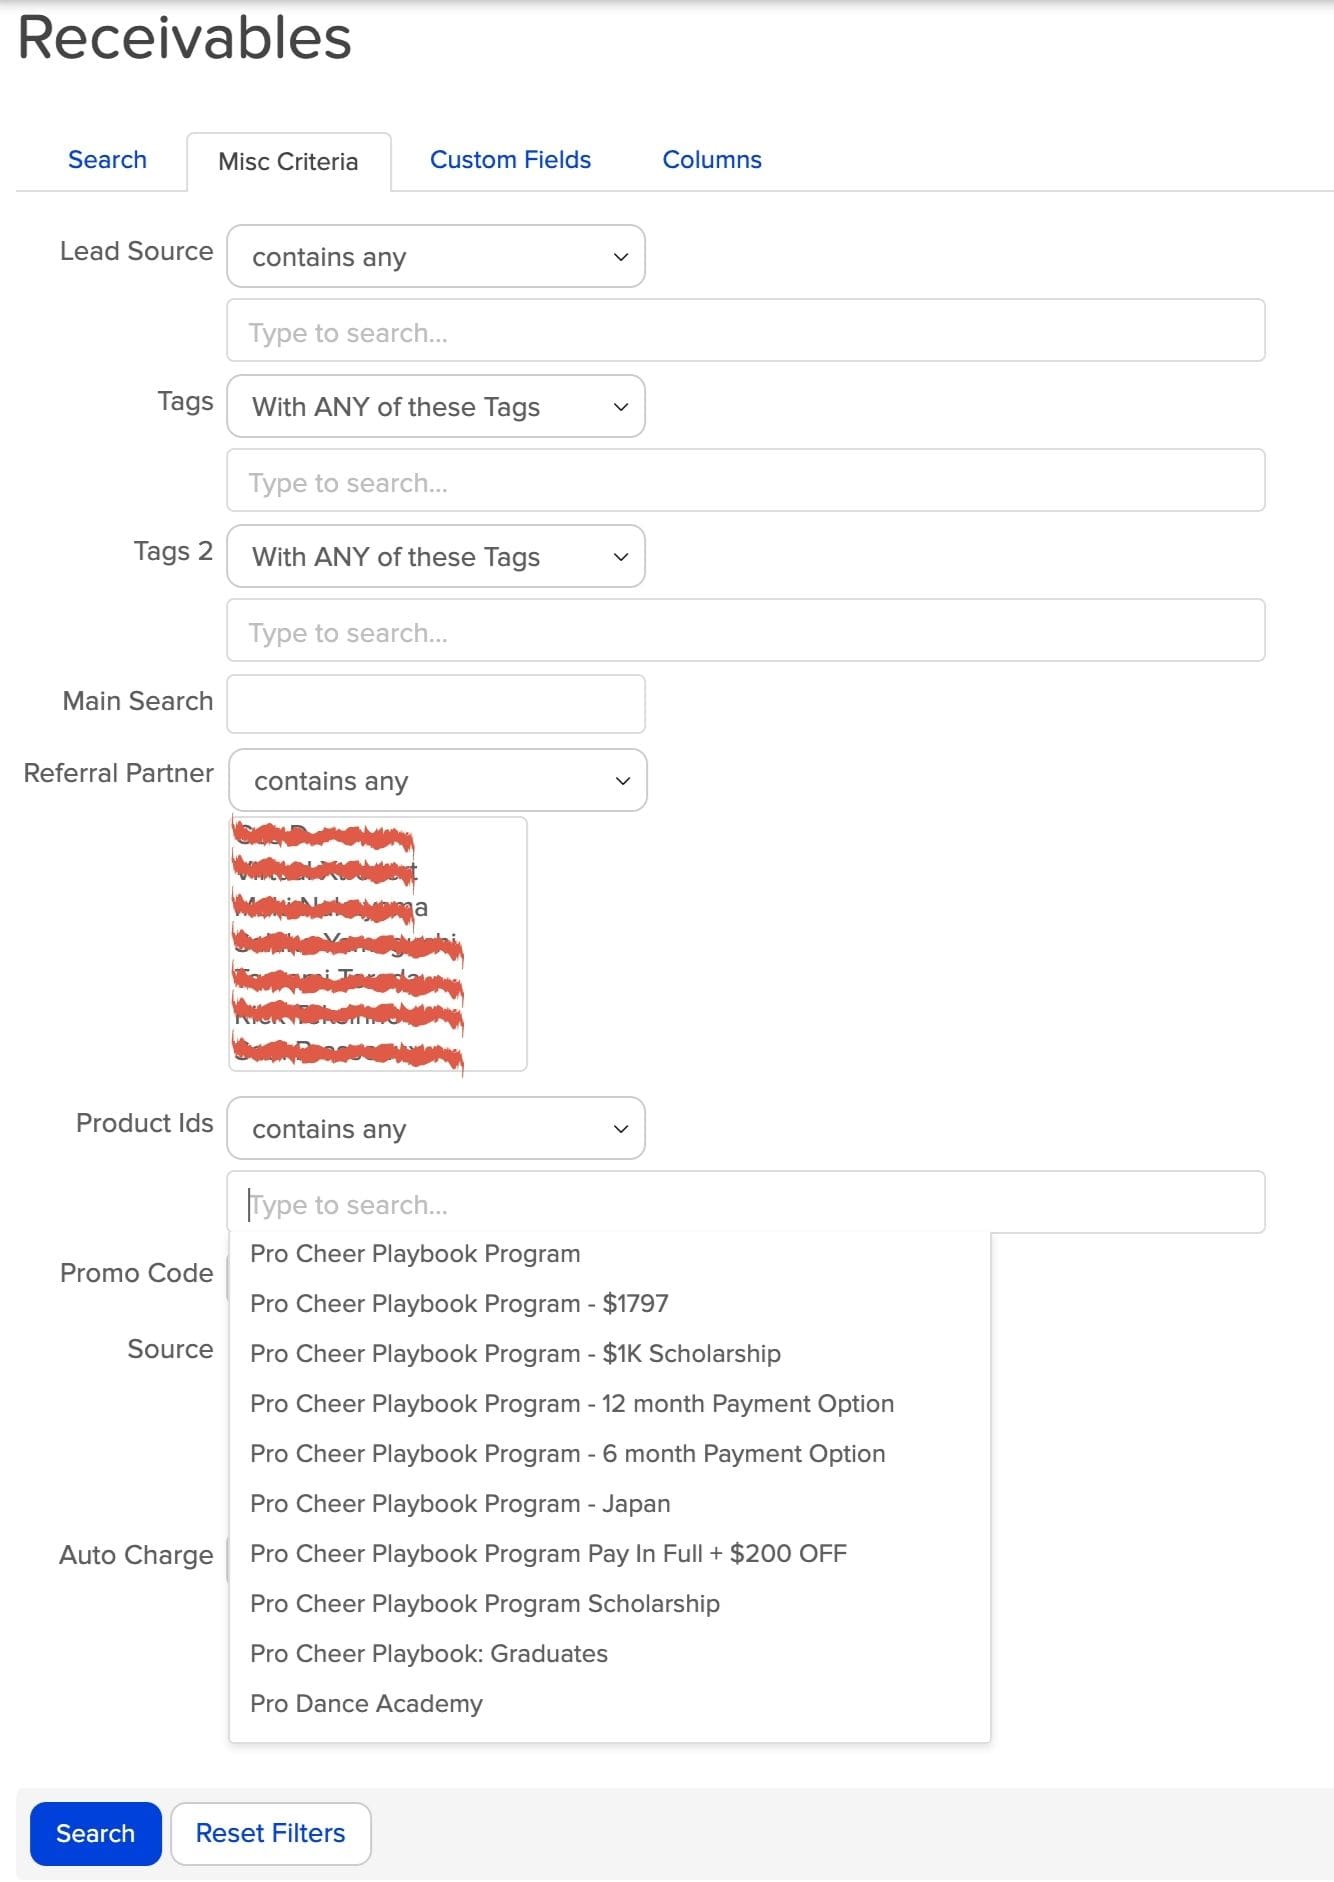
In this example, all of the products are recurring in nature, so there’s no need to make that distinction.
Here you only need to set the criteria up by date. But even then, it can get tricky for you.
Naturally, most businesses will want to set up their reporting to span an entire month.
So if you wanted to set up a failed payment report for August and perform the task in the month of August, you’ll see that the report will show future payments not yet occurred.
Follow me on this one.
If you run a Receivables report in Infusionsoft for the time period August 1 - August 31 and run that report on August 17th, it’s going to show you all the payments that failed from August 1 - August 16 and all of the payments yet to process from August 17 - August 31.
So what’s the best way to deal with that and be timely with failed payments?
There’s one of two options for you to consider:
1. Run a weekly report tracking delinquent payments from the previous week
This option will allow you to follow up with delinquent payments in Infusionsoft in a timely manner. But it will take a considerable amount of work on your part (more on that below).
2. Run reports in 15 or 30 day intervals
The longer the interval, the less report making you will have to do. But it also will stack up the workload to go after these failed payments and recover lost customers.
One of the major downsides of Receivables reporting in Infusionsoft is that you cannot set up rolling date reporting.
Meaning, if you set up a 30 day interval report to cover the month of July, you have a set ANOTHER 30 days report to cover the month of August.
That makes tracking failed payments in Infusionsoft a labor-intensive task.
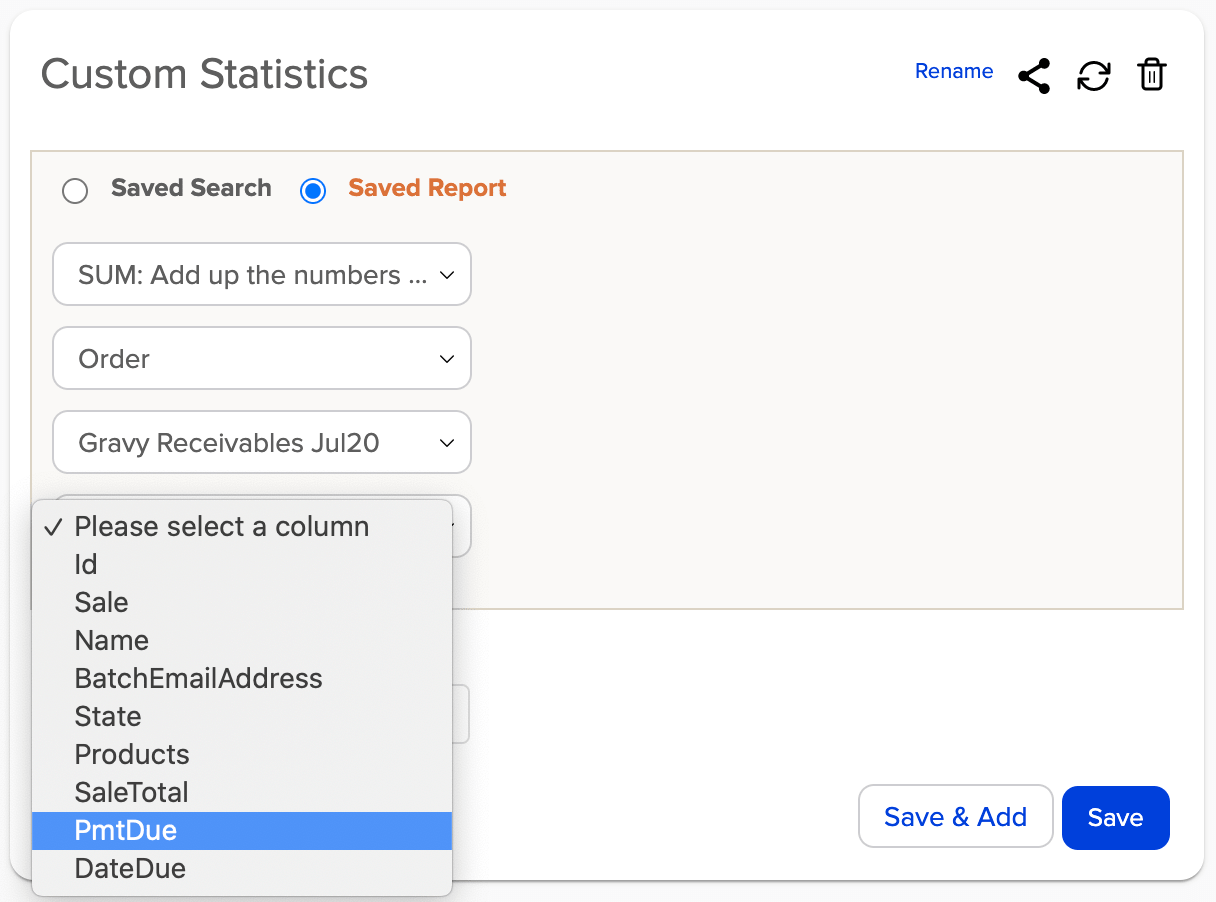
Keep in mind you will want to be sure you include the Pmt Due column in any report that you run so that you’ll be able to use it to as part of placing this report in your Dashboard later on.
To ensure that, go to the Edit Criteria/Columns, choose Columns, and make sure that Pmt Due option is on the left side.

Set up the Receivables report to run whatever date range you want.
For this example we’ll use the entire month of July.
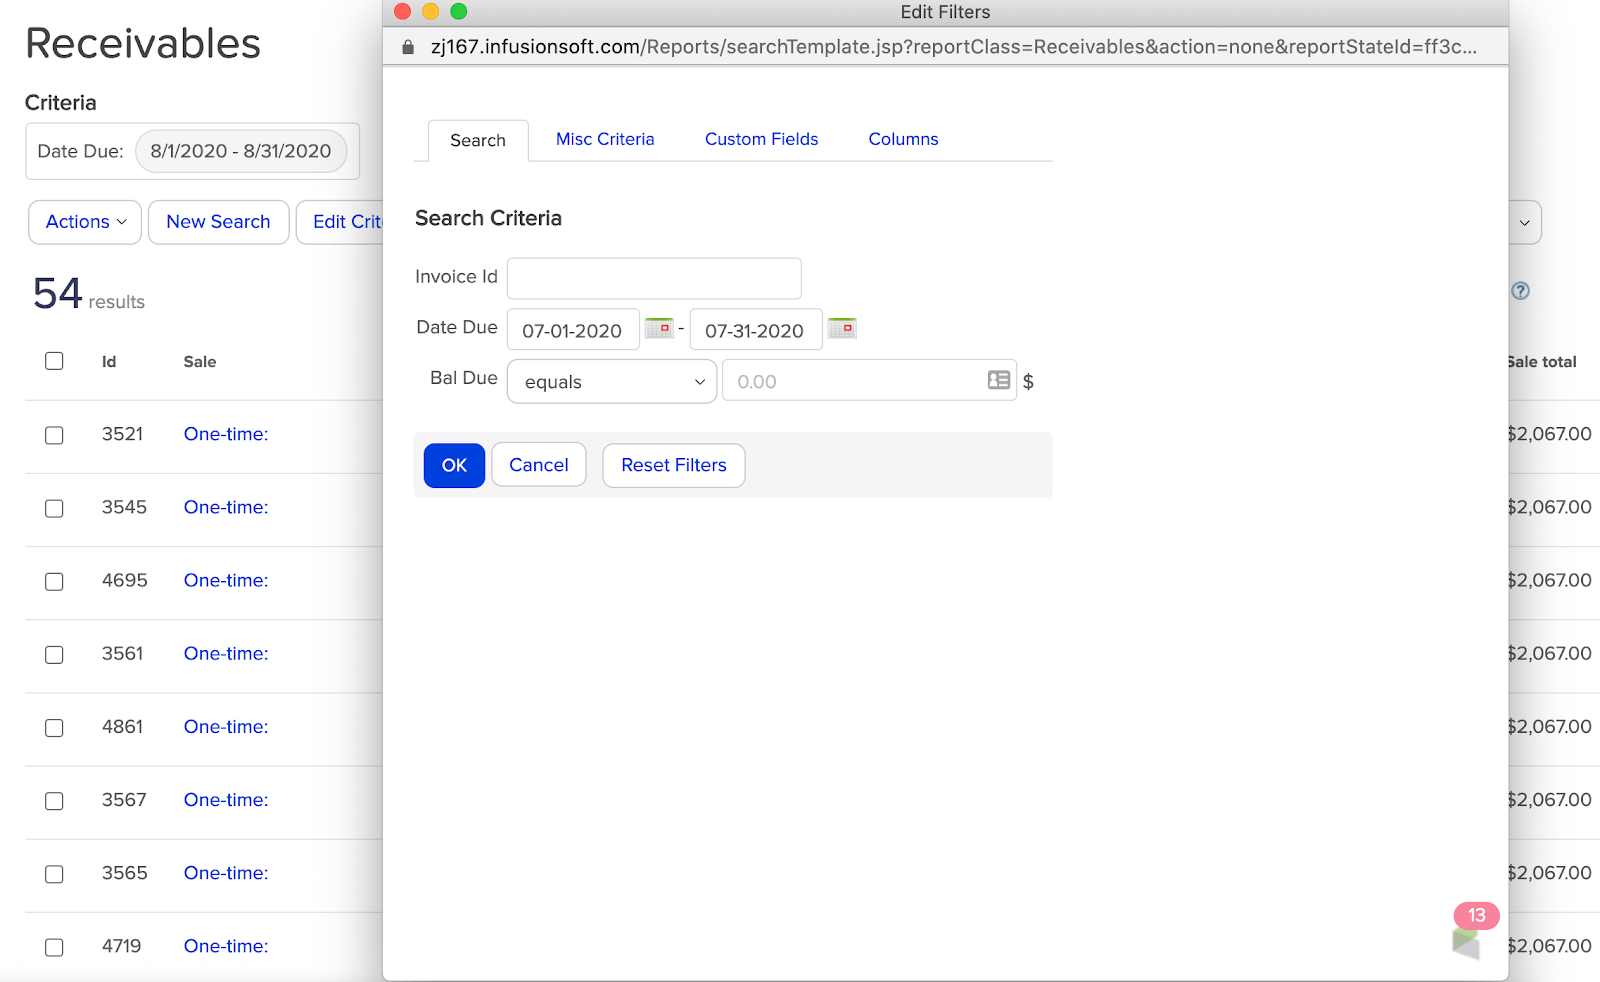
When we run the report, we get the following results:
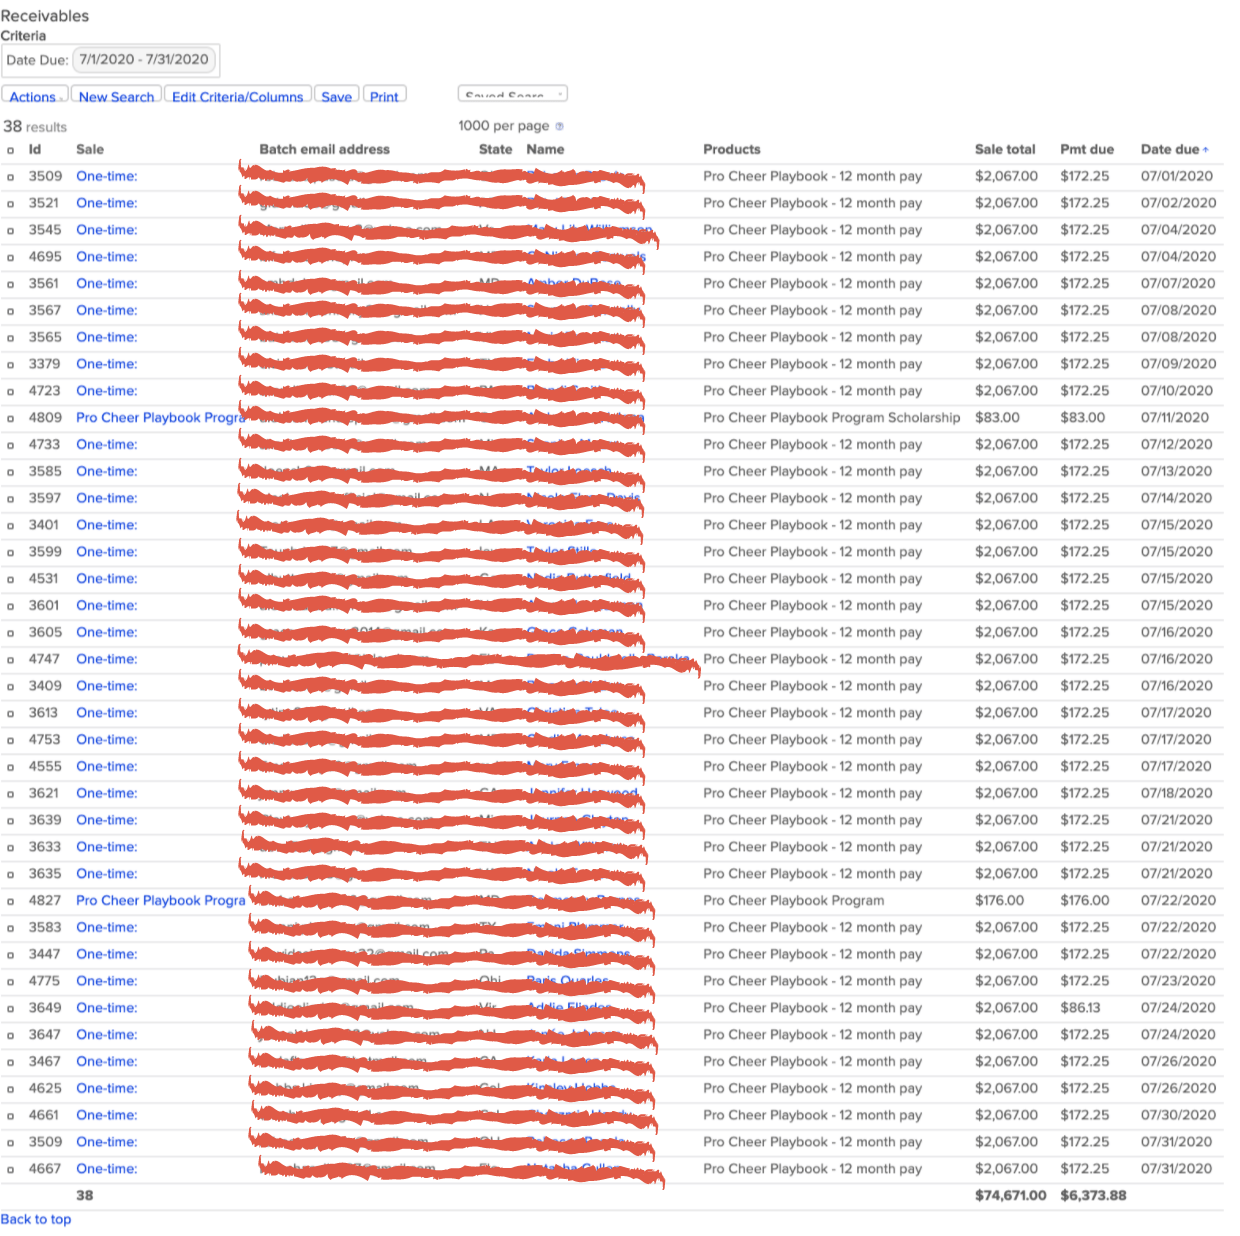
That’s 38 failed payments for July with a total revenue loss of $6,373.88.
Extrapolate that over 12 months as a rolling average, and your business is losing $76,486 per year to failed payments.
Now not every month will look the same, but based on our own industry data, the average small business loses nearly $9,000 per month and over $105,000 per year to failed payments.
3. Add Report to Dashboard
Now that you know how to create a Delinquent Payment Reports in the Receivables section, the next thing to do is to add it to your Dashboard so you can have greater visibility.
To save to your Dashboard, hit Save at the top of the menu after running your Report.

Name your report and choose the people who you want to share the report with, then click Save.

Saving the report doesn’t mean it will appear in your Dashboard. If you want to add this report to the Dashboard, you’ll have to go there and complete a few additional steps.
First, hit the hamburger menu again and go to your Dashboard area on the far left side.

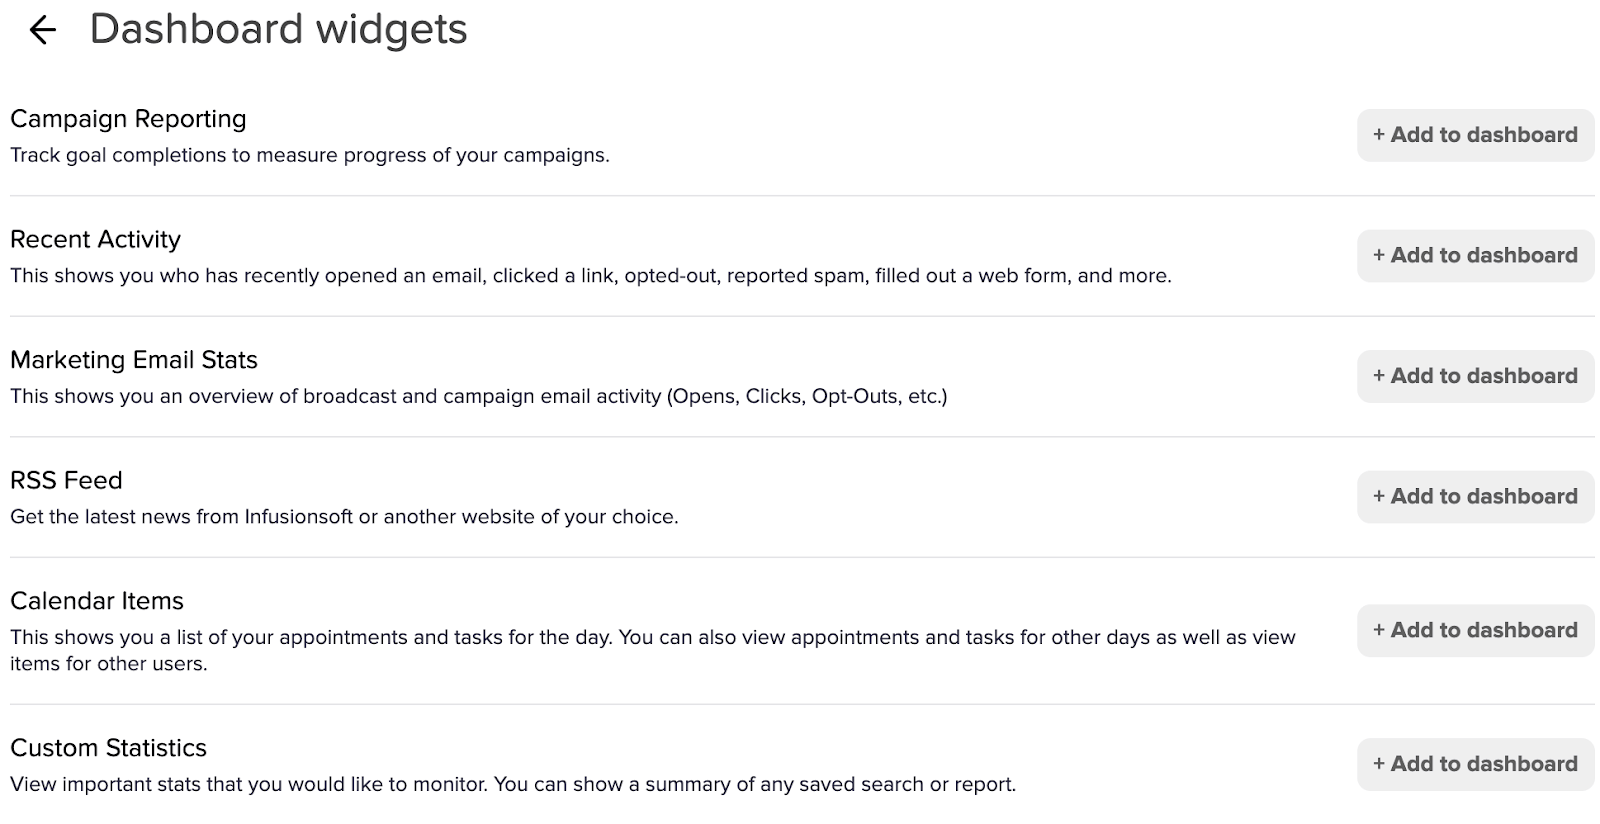
On the far right side of the Dashboard, choose the 3 dots and select Add Widget.

From there, choose Custom Statistics. You’ll be prompted back to your Dashboard area to configure which statistic you’ll want to display.
From there, you’ll configure the statistic to show the Sum of the Payment Due (PmtDue) from the correct report in order to add it into the dashboard, as shown below.
This is why choosing Pmt Due as a column when building the report earlier is so important.
This will result in your delinquent payment report showing up in your Dashboard like so:

And voila! You’ve created a failed payment report in Infusionsoft.
Now comes the even harder part, getting those customers back online and into your subscription program.
4. Get Help If You Need It
Not every company has the tools, resources, or wherewithal to get those churned customers back online and engaged in your business.
If that sounds like you, that’s exactly what we help with. Gravy helps recurring revenue businesses rescue their failed payments customers to help keep them with your business and happily engage.
How do we do that? We use people at the heart of the process, not automated outreaches or cold dunning processes.
Want to see how we can help? Don’t hesitate! Book time with us now and we’ll help you walk through your failed payments and how we can expedite lost revenue back into your company. Hit the chat on the bottom right (Biscuit the Bot) to get started on your way to more revenue returned.
Also, read our post on 3 ways businesses can recover failed payments so that you can dominate your year.


.jpg)

